마스터Q&A 안드로이드는 안드로이드 개발자들의 질문과 답변을 위한 지식 커뮤니티 사이트입니다. 안드로이드펍에서 운영하고 있습니다. [사용법, 운영진]

탭호스트에서, 2번째 탭 부분을 다음과 같이 만들고 싶은데.. 어떻게 해야할까요.

+1 추천


안녕하세요..

탭호스트 관련해서, 어떻게 해야할지 잘 몰라서.. 이렇게 글을 씁니다.

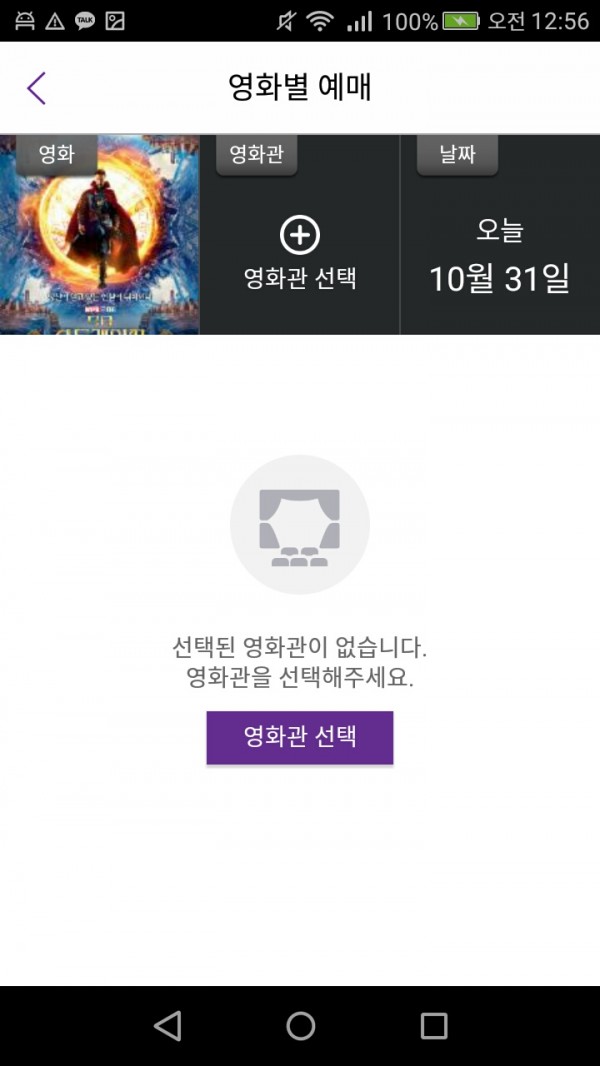
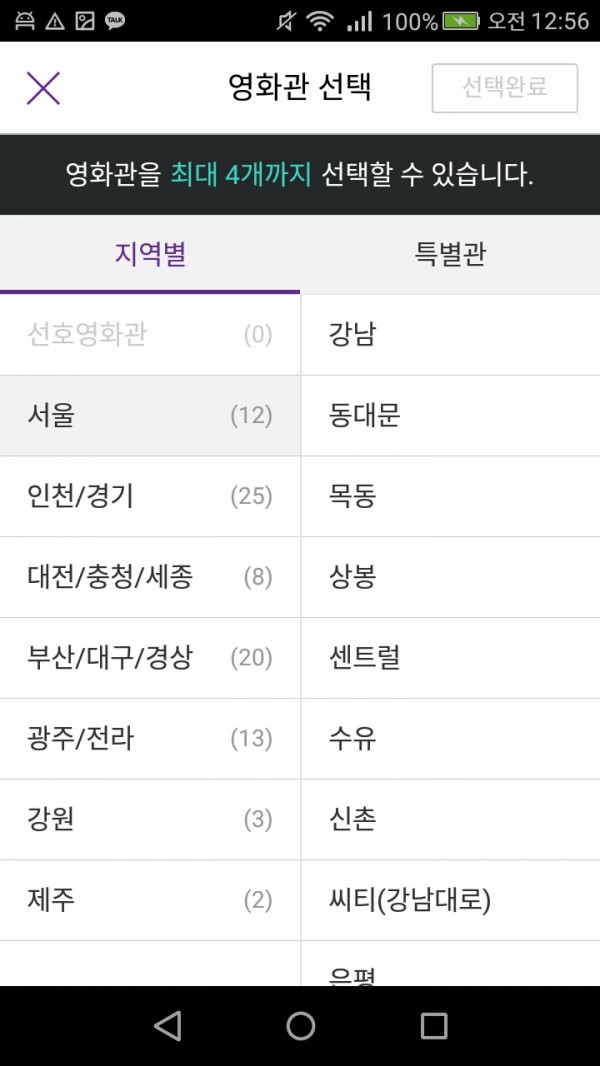
제가 궁금한 부분은, 바로 아래의 사진에서 영화관 선택을 눌렀을 경우에, 2번째 사진처럼 나오게

만들려고 하는데.. 그 방법을 잘 모르겠습니다.

바로 탭 아래에 생기는것이 아니라, 구조는 비슷한데 다른 액티비티같은곳(?)에서 지역을 고르고 난 뒤에

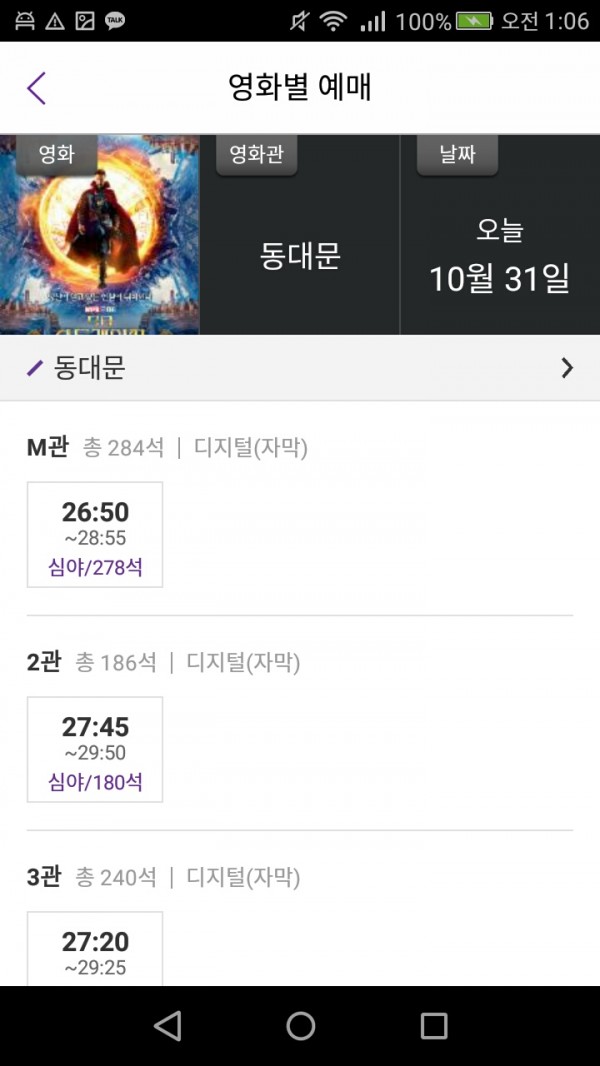
세번째 이미지와 같이, 원래의 2번째 탭 부분에 선택한 지역이 써지는 구조로 되어 있습니다.

어떻게 해야, 첫번째, 아래의 이미지에서 2번째 탭인 영화관 선택을 눌렀을 경우에, 2번째 이미지와 같이

값을 입력받는 부분으로 이동하게 될까요 ..ㅠ 저부분은 그냥 별도의 액티비티로 만들어야 하는건지..

아니면 탭 호스트 부분에서 따로 기능이 있는건지 답이 안보입니다.

아직 초보인 제게 도움이 필요합니다 ㅠ  아래에 탭호스트의 자바소스와

.xml 코드 소스를 한번 담아 보았습니다.


 <Date and Seat> . xml 파일입니다.

<?xml version="1.0" encoding="utf-8"?>
<LinearLayout xmlns:android="http://schemas.android.com/apk/res/android"
    xmlns:tools="http://schemas.android.com/tools"
    android:id="@+id/activity_date_and__seat"
    android:layout_width="match_parent"
    android:layout_height="match_parent"
    android:orientation="vertical"
    tools:context="ex.real_project.Date_and_Seat">

    <RelativeLayout
        android:id="@+id/Date_and_Seat_Toolbar"
        android:layout_width="match_parent"
        android:layout_height="wrap_content">

    <ImageView
        android:id="@+id/Before_Date_and_Seat_Image"
        android:layout_width="wrap_content"
        android:layout_height="wrap_content"
        android:layout_marginTop="10dp"
        android:layout_marginBottom="3dp"
        android:layout_marginLeft="3dp"
        android:background="@drawable/before_image" />

    <TextView
        android:layout_width="wrap_content"
        android:layout_height="wrap_content"
        android:text="영화별 예매"
        android:textSize="30dp"
        android:textStyle="bold"
        android:layout_marginTop="10dp"
        android:layout_centerHorizontal="true" />

    </RelativeLayout>


Kind카인드 (3,600 포인트) 님이 2016년 11월 1일 질문
<TabHost
            android:id="@+id/tabhost"
            android:layout_width="fill_parent"
            android:layout_height="fill_parent"
                >

            <LinearLayout
                android:layout_width="match_parent"
                android:layout_height="match_parent"
                android:orientation="vertical" >

                    <TabWidget

                    android:id="@android:id/tabs"
                    android:layout_width="fill_parent"
                    android:layout_height="wrap_content" >

                     </TabWidget>

                <FrameLayout
                    android:id="@android:id/tabcontent"
                    android:layout_width="fill_parent"
                    android:layout_height="fill_parent" >

                    <ScrollView
                        android:id="@+id/tab1"
                        android:layout_width="fill_parent"
                        android:layout_height="fill_parent" >

                        <TableRow
                            android:id="@+id/tableRow1"
                            android:layout_width="fill_parent"
                            android:layout_height="fill_parent">

                            <TextView
                                android:id="@+id/textView1"
                                android:layout_width="match_parent"
                                android:layout_height="match_parent"
                                android:background="@drawable/first_tab_image"
                                android:textAppearance="?android:attr/textAppearanceMedium" />

                        </TableRow>

                    </ScrollView>

                    <ScrollView
                        android:id="@+id/tab2"
                        android:layout_width="match_parent"
                        android:layout_height="match_parent" >
   // 여기다 지역을 고르는 부분을 만들어야 할것 같아요..요..                        <TextView
                                android:id="@+id/textView2"
                                android:layout_width="wrap_content"
                                android:layout_height="wrap_content"
                                android:text="test2"
                                android:textAppearance="?android:attr/textAppearanceMedium" />
                    </ScrollView>

                    <ScrollView
                        android:id="@+id/tab3"
                        android:layout_width="match_parent"
                        android:layout_height="match_parent" >

                        <TextView
                            android:id="@+id/textView3"
                            android:layout_width="wrap_content"
                            android:layout_height="wrap_content"
                            android:text="test3"
                            android:textAppearance="?android:attr/textAppearanceMedium" />
                    </ScrollView>

                </FrameLayout>
            </LinearLayout>
    </TabHost>
</LinearLayout>


<Date and Seat> . java 파일입니다.
package ex.real_project;

import android.support.v7.app.AppCompatActivity;
import android.os.Bundle;
import android.view.View;
import android.widget.ImageView;
import android.widget.TabHost;
import android.widget.Toast;

public class Date_and_Seat extends AppCompatActivity {

    ImageView Before_Date_and_Seat;

    @Override
    protected void onCreate(Bundle savedInstanceState) {
        super.onCreate(savedInstanceState);
        setContentView(R.layout.activity_date_and__seat);

        TabHost tab_host = (TabHost) findViewById(R.id.tabhost);
                tab_host.setup();

                TabHost.TabSpec Tap1 = tab_host.newTabSpec("tab1");
                Tap1.setIndicator("영화");
                Tap1.setContent(R.id.tab1);
                tab_host.addTab(Tap1);

                TabHost.TabSpec Tap2 = tab_host.newTabSpec("tab2");
                Tap2.setIndicator("영화관 선택");
                Tap2.setContent(R.id.tab2);
                tab_host.addTab(Tap2);

                 TabHost.TabSpec Tap3 = tab_host.newTabSpec("tab2");
                 Tap3.setIndicator("날짜");
                 Tap3.setContent(R.id.tab3);
                 tab_host.addTab(Tap3);

                tab_host.setCurrentTab(0);


        Before_Date_and_Seat = (ImageView) findViewById(R.id.Before_Date_and_Seat_Image);
        Before_Date_and_Seat.setOnClickListener(new View.OnClickListener() {
            @Override
            public void onClick(View view) {
                finish();
            }
        });

        int position = getIntent().getExtras().getInt("poss");
        Toast.makeText(getApplicationContext(),"으악" + position,Toast.LENGTH_SHORT).show();
    }
}

1개의 답변

0 추천
 
채택된 답변
굳이 탭호스트를 쓰는 이유를 모르겠군요

2번째 버튼(탭) 눌렀을때 탭 유지하려면 Fragment

유지 안해도 된다면 Intent로 Activity 전환하던가 간단하게 Dialog
익명사용자 님이 2016년 11월 1일 답변
Kind카인드님이 2016년 11월 1일 채택됨
어떤분께서, 위와 같이 만드려면 탭 호스트가 적절하다고 하셔서 만드려고 합니다. 말씀하신대로면, 따로 액티비티를 전환해야겠어요
감사합니다.
...